Tuesday, March 30, 2010

Avocado Dip and Corn tortilla chips


As you probably can tell from previous posts Jeff & I have kinda fallen off the wagon of healthier and lighter eating. It started with "if the girl scout cookie is broken you dont have to count it" ... to eating a whole pan of Lasagna.  Since smashing an entire box of Thin Mints to feel better about inhaling it is not really where we want to go its back to eating healthy!  As fun as it was to eat naughty, and I will admit it's kinda fun for a while, I am excited to eat healthy again and to not feel like a blob.
My favorite food at the moment is avocado, I seriously love it better than any Easter chocolate. So last night I made something really light for dinner since I was still stuffed from the lasagna feast earlier.
This is a really simple dip that celebrates the fresh flavor of all the ingredients.  The corn chips go great with it and are definitely better for you than your bagged chips.  Plus how can you not impress people with your own little "homemade" corn chips.

Guacamole
Ingredients:
  • 1 ripe avocado
  • 2 Tbsp finely chopped onion
  • 1 tomato, chopped
  • 2 Tbsp lime juice
  • fresh ground pepper to taste
1. Remove avocado from skin and mash with a fork in a bowl.  Add the remaining ingredients and mix thoroughly

Corn Tortilla Chips
Ingredient:
  • 5 corn tortillas
1. Preheat oven to 375 degrees. Cut corn tortillas into quarters and place in a single layer on a cookie sheet. Bake for 8 - 10 minutes till chips are crispy.
(if you feel the chips are too chewy bake them a little longer!)

Wednesday, March 24, 2010

Cheddar Biscuits and Gravy


Growing up we used to love it when my dad would make homemade biscuits & gravy for dinner. Craving some comfort food I found a good recipe from Sandra's Money Saving Meals.  For the gravy I just cooked a pound of pork and only used half, freezing the remainder in a ziplock bag. 

Gravy
Ingredients:
  • 1/2 lb ground pork
  • 3 Tbsp canola oil
  • 3 Tbsp flour
  • 2 cups milk
  • 1 tsp thyme
  • salt & pepper to taste
1. In a large skillet, over medium heat, brown pork.  Season with a little salt & pepper and set pork aside in a separate bowl. Drain any excess liquids from pan.
2. In the same skillet whisk together the oil and flour over medium heat. Add milk, thyme, salt & pepper.  Keep whisking over medium heat till thickened. Add cooked pork and serve.

Cheddar Biscuits
 Ingredients:
  • 2 1/3 cup flour
  • 1 Tbsp baking powder
  • 1 tsp salt
  • 1/3 cup shortening
  • 3 Tbsp melted butter
  • 3/4 cup milk
  •  1 Tbsp parsley
  • 1/2 cup grated cheddar cheese
1.  Preheat oven to 425 degrees.  In a large bowl sift together the flour, baking powder, & salt.  Using a pastry blender cut in the shortening (if you do not have a pastry blender then you can use a fork to cut in the shortening or use a food processor).
2. Add melter butter, milk, & parsley stirring till just blended.  Gently fold in the cheddar cheese. 
3. Place a sheet of parchment paper on a cookie sheet and drop large spoonfuls of the biscuit mixture onto the sheet.  Bake for 10-12 minutes till it just starts to turn brown.

Monday, March 22, 2010

I've had way too much Easter Candy...

Parents!  Know when to just say NO to Mall Easter Portraits!!

Giggle....

Friday, March 19, 2010

Cream Filled Chocolate Cupcakes

My mom gave me this little cookbook/pamphlet called Cake Mix Miracles.  I have no idea where she got it but it has all sorts of fun recipes that are quick & easy using a box of cake mix.  Mmmmmm cakes, cupcakes, cookies...I just had to try it out. These cupcakes remind me of the hostess cupcakes you buy in the store and definitely a fun thing to whip up for a kids party.  Emma was thrilled to help me make them and even more thrilled to make sure they tasted good enough for daddy to try some.

Self- Filled Cupcakes
Ingredients:
  • 1 (18.25 oz) box of devil's food cake mix
  • 1 (8 oz) package cream cheese, softened 
  • 1/3 cup sugar
  • 1 large egg
  • 1 cup semisweet chocolate chips

1. Prepare cake mix according to package directions. Spoon batter into paper-lined muffin pans, filling to half way.
2. Beat cream cheese and sugar at medium speed with an electric mixer until fluffy. Add egg beating well. Stir in chocolate chips.  Spoon 1 tsp cream cheese mixture into the center of each cupcake.  Cover the top of the cupcake with 1 tsp batter.
3. Bake at 350 degrees for 25 minutes. Remove from pan and cool on wire racks. Store in fridge.
so why cant we forget baking & just eat the batter?

Wednesday, March 17, 2010

Shepherd's Pie

Happy Saint Patrick's Day!
I've always had a fondness for this holiday...any kid loves a holiday with their name in it no matter how vague.  The fact that it has nothing to do with me was besides the point, everyone was happy celebrating me day :)
So I know that Shepherd's Pie is not really Irish but more British but this is what you get when you watch the BBC all day, a huge craving for English food no matter what holiday it is... and I'm going to use today as an excuse to make it. :)  Especially since previously on a St Paddy's day I made French Onion Soup with Irish Beer only to find out that Jeff loathed onion soup.  So this year its simple (& cheaper) - meat & potatoes!
Shepherd's Pie from what I've seen traditionally has lamb but I'm going to go with beef which I guess makes it more of a Cottage Pie except I do want it to be the meat & potatoes dish with not a lot of veggies...decisions decisions!!

Shepherd's Pie
Ingredients:
  • 4 large potatoes, peeled
  • 2 Tbsp butter
  • 2 egg yokes
  • 1/2 cup Parmesan cheese
  • 1 lb ground beef
  • 1-2 Tbsp olive oil
  • 1/4 cup grated onion (grated on the larger grate side)
  • 2 cloves garlic, minced or grated 
  • 1 cup grated carrot (grated on the larger grate side)
  • 1/4 cup Worcestershire sauce
  • 1 Tbsp Ketchup
  • 1/8 tsp ground Thyme
  • 1 cup beef broth
  • salt & pepper to taste
  • Extra Parmesan Cheese for the top
1. Preheat oven to 375 degrees. Place a large pot of water on high heat for the potatoes.  Cut the potatoes into chunks and add to boiling water. Cook till tender, about 15 minutes. When done drain water.  Mash in butter, egg yoke, and salt & pepper. Set aside.
2. Heat oil in a large frying pan on medium heat and add onion.  Cook for about 2 minutes. Add ground beef seasoned with a little bit of salt & pepper and minced garlic. Cook till meat is well browned. Drain excess fat from pan. Add carrots and worcestershire sauce mixing well. Add in frying pan the ketchup, thyme, and beef broth. Let simmer for about 5 minutes.

3. With a slotted spoon pack the meat mixture in the bottom of a 2 qt casserole dish, trying to not include a lot of the liquid. Add the mashed potatoes on top. Sprinkle a bit of Parmesan cheese and ground pepper on top.  Bake in preheated oven for about 20 minutes till top is nice and brown.
 mmmmm meat and potatoes....

Sunday, March 14, 2010

The Daring Cooks Risotto Challenge


The 2010 March Daring Cooks challenge was hosted by Eleanor of MelbournefoodGeek and Jess of Jessthebaker.  They chose to challenge Daring Cooks to make risotto. The various components of their challenge recipe are based on input from the Australian Masterchef cookbook and the cookbook Moorish by Greg Malouf.

I have joined a cooking community that challenges bloggers once a month to try a new recipe. This month it was risotto and the only requirement was that you have to make your own chicken stock, the rest you can be as creative as you want. 
Since I have never made risotto I went with the suggested recipe the hostesses provided for Preserved Lemon Risotto & since I didn't have the preserved lemon I used lemon zest.  It was definitely very lemony and would go well with fish, of course I didn't realize this till after it was all made and we were sitting down to dinner with just a nice side dish :)
My mom came over to help me make the chicken stock and I have to say I am in LOVE with making my own stock now.  It was so much easier to do than I thought it would be and so much cheaper and better for you than store bought.  I have already used the leftover stock so now I have to go make some more! Plus having the chicken meat as leftovers is a nice bonus.  

Chicken Stock
Ingredients:
  • 1 large chicken 2-3 pounds about 1 kg (can just buy a separated chicken bone-in too)
  • chicken bones 2-3 pounds 1 kg
  • 2 onions, roughly diced
  • 1 medium leek - white part only, roughly diced
  • 2 sticks celery, roughly diced
  • 2 cloves garlic, halved
  • 1 cinnamon stick
  • 1 tsp. white peppercorns ( Any type of whole peppercorn will do)
  • 2 bay leaves (fresh or dried, it doesn't matter.)
  • peel of 1/2 lemon
  • 1/4 tsp. allspice
 Directions:
  1. Wash the chicken and bones and places in a 5 Litre pot, cover completely with water and bring to a boil
  2. Skim away any scum as it comes to the surface
  3. Add the vegetables and bring back to a boil
  4. Add the rest remaining ingredients and simmer very gently, uncovered for 1.5 hours
  5. Carefully lift out the chicken, set aside. The chicken meat can be removed from the chicken, shredded off and used for other things like soup!
  6. Simmer the stock gently for another hour. At , at the end you should have around 2 Liters
  7. Carefully ladle the liquid into a fine sieve, the less the bones and vegetables are disturbed in this process the clearer the stock will be. 
The stock is now ready for use. Freeze what you don't need for later use.
 Risotto Base
Ingredients:
  • olive oil 2 fluid oz 60 ml
  • 1 small onion, quatered
  • rice 14 oz 400g
  • Any type of risotto rice will do
  • white wine 2 fl oz 60 ml
    chicken or vegetable stock , simmering 2 pints 1 L
 Directions:
  1. Heat oil in a pan and add onion. Fry for a few minutes to flavor the oil then discard. (you can leave the onion in too).
  2. Add the rice and stir for a few minutes to coat each grain of rice with oil and toast slightly.
  3. Add the wine and let it bubble away until evaporated.
  4. Add enough stock to cover the rice by a finger’s width (about an inch or two). Don't actually stick your finger in, it will be hot. Just eye it off.
  5. Cook on medium heat, stirring with a wooden spoon from time to time, until most of the stock has been absorbed.
  6. Repeat Step 5 making sure to leave aside approximately 100 ml. of stock for the final step. .
  7. Repeat, save 100ml for the final stage.
  8. Once you are at this point, the base is made. You now get to add your own variation.
Preserved Lemon Risotto 
Serves 4 as a starter or light lunch
Ingredients:
1 preserved lemon, peel only, finely diced. (Regular lemon zest will work as well.)
celery leaves, from the heart, finely chopped 1 Tbsp
unsalted butter 3.5 oz 100g chilled and cut into small cubes
parmesan cheese, grated 2 oz 60g
Directions:
  1. Make the base until the end of step 8.
  2. Stir through the preserved lemon
  3. Add the final 100ml of stock and butter and stir until both are completely absorbed. Stir through the parmesan, stick the lid on and let it sit for a few minutes.

Friday, March 12, 2010

Alfredo Sauce

While we were over at my sister's having our pasta extravaganza the other night I got the comment that my Alfredo Sauce tasted just like what you get in a restaurant (I'm guessing that comment was for the nice restaurant and not the dive down the street :)
I wanted to post how simple it really is to whip this up for those of you who have never made your own. For the time it takes for pasta to cook I can be done with this sauce which for me, the queen of "have to have it all ready at the same time", is wonderful.  Plus unlike the 10,000 calorie sauces in restaurants this one I make with 1% milk ...  waaaay nicer to my tummy and to my thighs ;)

The picture is our favorite way to serve this sauce...bowtie pasta, steamed green beans, and slices of cooked turkey bacon. Steamed broccoli is also really good in this too!


Alfredo Sauce
This recipe makes enough sauce for 2 (very hungry) people
Ingredients:
  • 2 Tbsp Butter
  • 2 Tbsp Flour
  • 1 cup Milk
  • 1 Tbsp dry parsley (if it is all leafy sometimes I like to crush it slightly)
  • 1 tsp garlic powder
  • 1/2 tsp basil
  • fresh ground black pepper (adjust to your taste - we use about 1/2 tsp)
  • little bit of salt to taste (if you are adding turkey bacon use less or no salt)
  • 1/2 cup Parmesan cheese
1. Melt butter in saucepan.
2. Add flour and whisk together on medium or med/low heat, cook for about 1-2 minutes.
3. Pour in milk.
4. Whisk in parsley, garlic powder, basil, salt and pepper.
5. Turn the heat to medium med/high & heat bring to just bubbling, till the sauce thickens, making sure to stir while cooking. Give it a little taste test and adjust seasonings to your liking if needed.
6. Remove from heat and stir in the Parmesan cheese, pour over your favorite pasta and serve!
OPTIONAL: Add sliced turkey bacon or cooked chicken pieces to sauce before you add cheese (the only turkey bacon we ever get is Butterball - the rest tastes like cardboard to me)

Wednesday, March 10, 2010

Delish Cold Remedy a.k.a "Witch's Brew"

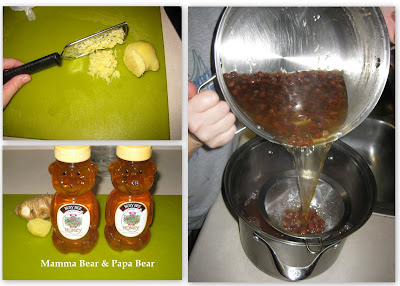
Jeff & I have been fighting a cold for a couple of days so I decided to whip out the big guns....a drink I've made in the past that has always made me feel sooooo much better and is really fun to make. The name "Witch's Brew" came from my roommate Melissa who came home from work one night to find a large pot of all sorts of interesting things boiling on the stove and me cackling over it (granted I was cackling from the cold but you get the picture). 
The Ginger in this gives such a nice little kick and is so soothing for your tummy. Jeff was really digging it.

Witch's Brew

Ingredients:
  • 2 cups of raisins 
  • One large ginger root (about 4 oz)
  • 24 oz of honey (two honey bears)
  • 1 cup Lemon Juice (or 6 fresh squeezed lemons)
  • 1 1/2 cups Pure Orange juice, not from concentrate (or 4 fresh squeezed oranges)
  • 1 gallon purified water

1. Put water in a large pot on high heat.  Peel and grate the ginger root.
2. Add grated ginger, honey, & raisins to pot and bring to a boil. Lower heat & simmer uncovered for an hour, occasionally skimming foam from the top.
2. Cool, strain, & place in a tightly closed container in the fridge overnight. You can either throw out the raisins or snack on them :)
4. Add the orange & lemon juice the next day and drink up! Stir before pouring each time.

Monday, March 8, 2010

Making Homemade Pasta with my Mommy

I had such a great time visiting with my Mom these past two weeks.  Of course while she was here I had to get her to help me make homemade pasta. I've tried it before but it just didn't seem to come out the way I wanted to... it needed the Italian Mom's touch. Making this was really fun and of course we had to take it all over to my sister's house so everyone can enjoy the hours of labor that went into this pasta extravaganza! (granted many of those hours were spent just visiting but still hours nonetheless)
Making your own pasta is something I would recommend doing, its really fun and even if you don't have a pasta machine you can just use a rolling pin to roll it out thin. Cut into squares or circles to make ravioli and go to town on experimenting with fillings!

Making the Pasta Dough
Ingredients:
  • 3 eggs
  • 2 - 2 1/2 cups flour
  • a little bit of water
1. Pour flour in a large bowl and make a well in the center. Break the eggs into the well. Using a fork slowly start to whisk the eggs, gradually incorporating the flour into the mix. 
2. When it starts to form a ball place on a lightly floured surface and knead with your hands.  If it seems to be too dry add a Tbsp of water and mix, repeating if necessary till smooth (not too dry not too sticky). Don't fret if it feels like its taking forever for it to get kneaded together, just keep plugging away!
3. Wrap dough in some saran wrap and place in the fridge to rest for at least 20 minutes.

Now for the fun part ...the pasta machine! 
1. Using a knife cut off a small piece of the dough, making sure to wrap the rest back in the saran wrap so it won't dry out. Flatten the dough with your hand so you can feed it through the thickest setting on the machine (for mine it was setting 7). I learned that you really have to keep dusting the strips with flour so that it won't stick to the rolls in the machine. Be prepared to cover your kitchen, and yourself, with flour!
2. Feed the dough through each setting about 2 times, dusting occasionally as needed with flour to keep from sticking. Gradually keep adjusting the setting lower to desired thickness. You may need to cut the dough to keep it from growing too long (**ahem**).
3.  Be sure to not let the dough dry out before finishing, have your filling ready if you are making ravioli. If you are making linguine lay out on a floured surface or a cookie rack after you cut until you are ready to cook.
For the Linguine I stopped on the #2 setting, for the ravioli I stopped on the #1, the thinnest, setting.


Can you guess which person will make the longest linguine ever?

I just hated having to cut my dough to a more manageable size, it was just too fun seeing how long it would get.

Speaking of Linguine it was a life saver because each ravioli was made with such love and care (i.e. very slooowly) and I wanted to make sure there was enough food to feed seven people. Plus how can you not resist cranking out linguine like playdough!
now while those linguine get a bit of a rest we can start on the...

Ravioli Filling(s)!
We went with two different kinds of ravioli fillings just to make things more fun. Believe it or not the one that got devoured the fastest was the feta cheese and walnut one, even my little nephew couldn't get enough of it!

Feta, Walnut, & Spinach Filling
Ingredients:
  • Feta cheese (one regular container)
  • 1/4 cup chopped walnuts
  • Large handful of fresh spinach
1. Place spinach in a bowl with 1/4 cup of water, microwave on high for 2-3 minutes till wilted. Place in a colander to drain, squishing with the back of a spoon to get more water out.
2. Place all ingredients into a food processor and pulse till well blended and chopped.

The second filling was still really good

Chicken and Spinach Filling
Ingredients:
  • 2 Cooked Chicken Breasts, cut into chunks
  • 1 cup Shredded Parmesan Cheese
  • Large handful of fresh spinach
  • 1 tsp basil
  • ground pepper to taste

1. Place spinach in a bowl with 1/4 cup of water, microwave on high for 2-3 minutes till wilted. Place in a colander to drain, squishing with the back of a spoon to get more water out.
2. Place all ingredients into a food processor and pulse till well blended and chopped.

And finally... Stuffing those Ravioli 
(thought I'd never get to this part ;)

We tried several methods to making the ravioli.
First method we laid out the strips and placed the filling in little piles.
Then, after brushing some water around the filling, we laid another strip on top, making sure to press firmly around the filling to seal it in.
Using a knife we cut it into individual squares.


Another Method (and my favorite) was the "making little sombreros" as my mom put it.
Since apparently I will NEVER remember to buy myself cookie cutters we used a wine glass to cut out the shapes, sadly not the first time this glass has been used for this.
We found it easy to just cut out all the circles first then place the filling inside. To keep the work surface from getting wet we brushed water on the top piece and then pressed it down on the bottom to seal.

Aren't they just so cute!


And Tada! A Homemade Pasta meal!  I whipped up a Marinara sauce for the ravioli and an Alfredo sauce for the linguine, which I learned that if you make it too long it gets tangled up while cooking and some people will be served more of a "bird's nest" pile of linguine...chirp chirp!

Tuesday, March 2, 2010

Broccoli and Spinach Soup - Happy Birthday to me!

Yesterday was my birthday and Jeff created a feast for me!  I also received the most awesome birthday present from my sister, a brand new KitchenAid Classic Mixer, and had to take it for a test drive (I've wanted one of those for sooooo long). She included in the present all the ingredients for bread so it was a no-brainer what we would make - Jeff took the reins on making the bread and it came out so good with such a smooth texture.  Needless to say the bread slowly disappeared while the rest of dinner was cooking.  Next time bread gets made last :)
 
Must....Eat.....Bread....Now....

Jeff also wanted to cook me something all on his own with no help from me, I admit it's hard for me to sit still when he is in the kitchen.  For those of you who know Jeff he is definitely not someone who likes or wants to cook. Before we met his idea of slaving in the kitchen for dinner was making boxed Mac-n-Cheese. So I was thrilled he wanted to try and make something on his own. My friend Jen gave me the cookbook Therapeutic Chef so we chose the Broccoli-Kale Soup, which of course the store was out of kale so we substituted spinach. Below is the recipe as we adapted it to what we had in the house :) . I have to say that if you make this be ready for it to taste healthy, hee hee, which I guess is the point of the book.
(forgive my obsession with taking pictures of Jeff cooking - had to preserve this precious moment)

Broccoli & Spinach Soup
Ingredients
  • 1 Tbsp olive oil
  • 1 small onion, chopped
  • 2 garlic cloves, pressed
  • 1 pinch red pepper flakes
  •  3 cups vegetable broth
  • 1/2 head of cauliflower, cut into pieces
  • 1 bunch of broccoli, cut into pieces
  • 1/4 cup cashews
  • Handful of fresh spinach
  • 1 lemon zested and the juice from half

1. In a large heavy soup pot saute the onions in the olive oil over medium heat for about 10 minutes. Add the garlic and red pepper flakes and cook for 1-2 minutes more.
2. Slowly add the vegetable broth while stirring and bring to a boil.  Add cauliflower, broccoli, and cashews and cook covered for about 10 minutes till all tender.
3. Remove from heat and let cool before blending.  Add lemon juice and spoon about 1/4 of it into a blender. Puree and repeat with remaining soup.  Serve hot with a small sprinkle of lemon zest.

For the main dish we also had the "Jacob" meal I made a while back.  Mmmmm....meat & potatoes, homemade bread, & soup.  What a wonderful evening!